

最後更新時間: 2025 年 11 月 03 日
切換作業系統還要重開機真的好麻煩,有沒有更方便的方法讓 Mac 可以同時使用雙系統呢?
之前曾經推薦過大家 Mac 內建的 Boot Camp 雙系統教學,但現在的情況不太一樣了。
目前 Boot Camp 只支援 Intel 晶片的 Mac, 如果你是使用 Apple M 系列(像是 M1、M2、M3)的機型,那 Boot Camp 就派不上用場了。
好消息是,現在有更簡單的方法!
只要安裝 Parallels Desktop,就能在 Mac 上同時運行 Windows 或 Linux 系統,完全不用重開機,而且操作起來就像開另一個應用程式一樣自然方便。
它也是目前唯一同時支援 Intel 和 Apple 晶片的虛擬機軟體,不論你是哪一代 Mac,都可以用這款,讓我們繼續往下看吧!
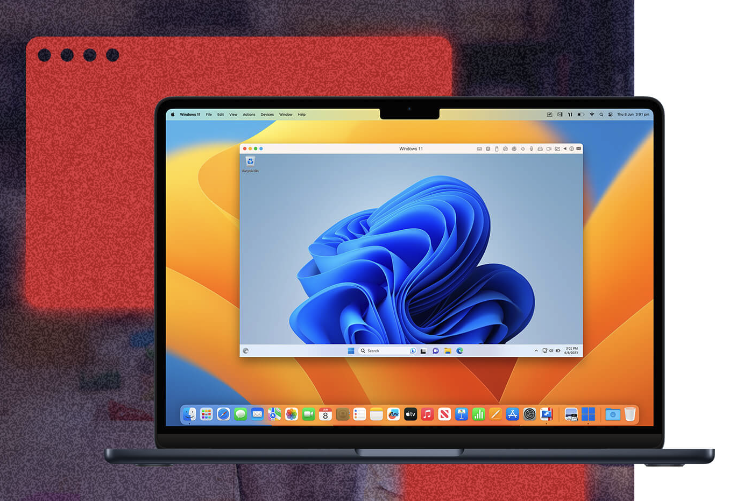
💻 Mac 也能順跑 Windows!
Parallels Desktop 可讓 macOS 與 Windows 同時運行,不需重新開機,檔案直接拖曳共享,工作更有效率。
🔥 618 限時優惠至 6/26
輸入優惠碼【PARALLELS45】享 55 折優惠
- 支援 Apple M 系列晶片
- 相容 macOS Sequoia
- 資料傳輸速度最高提升 4 倍
- AI 測試、程式開發、Windows 軟體都適用
不想為了 Windows 再買一台電腦?不妨試看看 Parallels 吧。
Parallels Desktop 是什麼?
Parallels Desktop 是一套可以在 macOS 上透過軟體運行 Windows、Linux 等其他作業系統的軟體,目前已更新到第 26 版囉!
為什麼會需要在 Mac 系統上 Windows 或 Linux 系統呢?相信有很多 Mac 愛用者或多或少會遇到需要使用讀卡機,或是想跟朋友打個線上遊戲,甚至想要編輯或測試程式碼時,就會發現 Mac 系統無法使用或不相容,這時候就需要使用到 Windows 或 Linux 系統來解決這個問題。
然而,大多數人都是應該都是使用 macOS 內建的雙系統軟體 Boot Camp,雖然不需要安裝很方便,但缺點就是需要重開機才可以切換系統,而且檔案經常無法共享,使用起來並沒有像想像中那麼好用。
而這款 Parallels Desktop 完全不需要重新開機!讓你輕鬆就能在 Mac 上直接運行 Windows 系統,並且可將整個系統視窗化、全螢幕,甚至使用融合模式將它變成 Mac Dock 上的其中一個應用程式,真的超方便!
如果你對 Parallels Desktop 感興趣,並且想要學習該怎麼用這款軟體的話,就繼續看下去吧!
Parallels Desktop 和其他雙系統軟體有什麼差異?
Parallels Desktop 和 Boot Camp 差在哪?

以前我在用 Mac 跑雙系統的時候,也都是靠 Boot Camp。
不過現在 Apple 已經全面轉向自家晶片,Boot Camp 只能用在舊款的 Intel Mac 上,M 系列 Mac 完全不支援。
如果你是使用 M1、M2 或更新的機型,唯一能在 Mac 上順利跑 Windows 的方法,就是使用 Parallels Desktop。
以下幾個差別超明顯:
- 不需重新開機就能切換系統(這點最有感)
- Mac 和 Windows 間可直接拖曳檔案、複製貼上
- 支援最新 macOS 和 Windows 11 on ARM,相容性更好
簡單說:
- 如果你用的是 Intel Mac,Boot Camp 跟 Parallels Desktop 都能用
- 但如果你用的是 M 系列晶片,那就直接選 Parallels Desktop,因為 Boot Camp 已經無法安裝。
Parallels Desktop 和 Game To Go 差在哪?
Game To Go 是一款專為遊戲打造的外接式雙系統,就像外接硬碟一樣,只要接上,並在開機時按著 option 選擇 Game To Go 硬碟開機,就可以運行 Windows系統了。

Game To Go 與 Boot Camp 相比的差異點在於:
- Boot Camp 所安裝的 Windows 系統會佔用儲存空間,Game To Go 則完全不會
- Game To Go 可當作隨身碟,解決了 Windows 與 Mac 資料不相通的問題
Game To Go 與 Parallels Desktop 相比的差異點在於:
- Parallels Desktop 只需直接安裝軟體,Game To Go 則需要另外攜帶一個裝置
- Parallels Desktop 切換系統不需重新開機,Game To Go 則需要重開機
Parallels Desktop 和 VMWare Fusion 差在哪?

我在 Mac 上使用第一款雙系統軟體就是 VMware Fusion ,因為以前工作所在的資訊公司長期使用 VMware Esxi 來做伺服器管理,學校又曾經教過 VMware WorkStation 來建立虛擬機,因此就對這個牌子比較熟悉。
Parallels Desktop 跟 VMware 都屬於付費軟體,但 Parallels Desktop 的融合模式還有系統優化真的是完全超越 VMware,如果要挑選還是比較推薦大家使用 Parallels Desktop 來運行雙系統。
Parallels Desktop 和 VirtualBox 差在哪?

如果想要使用免費的雙系統軟體,VirtualBox 也是個不錯的選擇,不過效能優化就沒有像付費的 Parallels Desktop 那麼完善,未來有機會我也會寫一篇 VirtualBox 運行雙系統的教學文章!
💻 Mac 也能順跑 Windows!
Parallels Desktop 可讓 macOS 與 Windows 同時運行,不需重新開機,檔案直接拖曳共享,工作更有效率。
🔥 618 限時優惠至 6/26
輸入優惠碼【PARALLELS45】享 55 折優惠
- 支援 Apple M 系列晶片
- 相容 macOS Sequoia
- 資料傳輸速度最高提升 4 倍
- AI 測試、程式開發、Windows 軟體都適用
不想為了 Windows 再買一台電腦?不妨試看看 Parallels 吧。
Parallels Desktop 的特色功能
操作方面、使用流程較直覺
- 不用重新啟動,可以同時開啟 Windows 和 macOS
- 各種作業系統皆可同時使用,如 Windows、Linux、macOS
- 可直接從 PC 遷移所有資料,移到 Mac 中使用
- 可以用中止模式暫停虛擬機,快速還原至上一次使用狀態
- 融合模式可以讓虛擬機融入 macOS Dock 中,就像應用程式一樣
資料共享共用非常方便
- 在 Mac 與 Windows 之間複製貼上文件,也可以用拖曳的!
- 設定在 Windows 和 Mac 之間任選檔案目錄共用
- 虛擬作業系統可與 Mac 共用設備、資源
支援性高、專業用途也可用
- 可以輕鬆運行 Windows 和其他 3D 應用程式
- Pro 版本可支援工程師、進階使用者的特殊需求
- 支援多種版本的 IE、Edge、Firefox 等瀏覽器預載安裝,可用於測試網頁開發
- 支援 Jenkins 進行連續整合(CI)功能
- 支援巢狀 Hyper-V 虛擬化,可在 Parallels Desktop 執行其他虛擬化軟體
- 支援 Docker
額外工具箱超多豐富功能

如果你跟我一樣是重度 Mac 使用者,你的電腦裡一定也裝了一堆好用的付費軟體吧?這些付費軟體加一加價格也不便宜,而 Parallels Desktop 提供的工具箱有很多可以替代付費軟體的功能,比如:
- 切換分辨率:可替代付費軟體 SwitchResX
- 隱藏選單圖標:可替代付費軟體 Bartender 3
- 視窗管理器:可替代付費軟體 Magnet
- 演示模式:隱藏圖標、通知、開啟 app 動畫
- 其他:查找重複項目、剪貼板歷史紀錄、轉影片檔…
除了 Parallels Desktop 擁有超豐富的工具箱外,另一款 macOS 專用的 Setapp 軟體訂閱平台也提供超過 260+ 以上的好用軟體,就像 Netflix 一樣,只要付訂閱費之後,裡面的所有軟體都可以免費使用!非常划算!
目前 Setapp 有提供 7 天免費試用,有興趣歡迎閱讀我們之前寫的介紹文章!
最新版 Parallels Desktop 26 功能介紹
Parallels Desktop 26 全新版本正式登場!這次不只是小幅更新,而是針對最新 macOS 系統、Apple 晶片與企業用戶都做了明顯優化。
以下幫大家快速整理這次 PD 26 的幾個重點更新 👇
支援 macOS Sequoia 15,穩定度再升級
PD 26 已全面支援最新的 macOS Sequoia 15 系統,整體運行速度與穩定性都更流暢。
無論是一般文書處理還是開發、設計類工作,都能在虛擬機環境中順暢執行。
特別是 Apple M 系列晶片的用戶,也能享受到更穩定的相容體驗唷!
企業功能升級
PD 26 對商務與企業用戶也做了不少強化:
- 大量部署工具更直覺,IT 團隊可快速設定與管理多台 Mac 的虛擬機環境。
- 新增授權管理與安全性設定,方便統一控管內部帳號。
- 改良網路設定與資料加密功能,讓資料傳輸更安全。
這些更新對中大型團隊、教育單位或需要虛擬測試環境的公司來說都非常實用。
效能優化與細節提升
PD 26 採用更高效的檔案系統整合技術,與 macOS 間的資料共享速度提升數倍。
像是拖曳大型檔案、在不同系統間同步資料,都更快速、更穩定。
圖形與音訊的相容性也同步強化,讓遊戲或多媒體應用的體驗更貼近原生環境。
下一步更新預告
Parallels 官方也預告,PD 26.2.1 將於 2026 年初推出更多亮眼功能,包含針對個人用戶的智慧化優化與 AI 工具整合。
整體來說,Parallels Desktop 26 不僅在效能與穩定性上更上一層樓,對企業管理與 Apple M 系列的支援也更完整。
如果你之前用過 PD 20 或 PD 21,升級到 PD 26 會非常有感!
若想搶先體驗新版本功能,可持續關注官網或這篇文章,我們會第一時間更新最新內容。
更加詳細的 Parallels 26 更新內容可以參考官網資料。
💻 Mac 也能順跑 Windows!
Parallels Desktop 可讓 macOS 與 Windows 同時運行,不需重新開機,檔案直接拖曳共享,工作更有效率。
🔥 618 限時優惠至 6/26
輸入優惠碼【PARALLELS45】享 55 折優惠
- 支援 Apple M 系列晶片
- 相容 macOS Sequoia
- 資料傳輸速度最高提升 4 倍
- AI 測試、程式開發、Windows 軟體都適用
不想為了 Windows 再買一台電腦?不妨試看看 Parallels 吧。
誰適合用Parallels Desktop?
- 電腦效能足夠的人:因為 Parallels Desktop 是以虛擬機的方式運行 Windows 或其他作業系統,需要具備一定的電腦效能。
- 遊戲玩家:Parallels Desktop 相當適合輕、中度的遊戲玩家
- 程式開發者:Pro 版本的 Parallels Desktop 提供很多專業的特殊功能供開發人員使用
- 碩博士生:許多論文相關軟體都只能在 Windows 上運行,使用 Parallels Desktop 的融合模式,可以讓你完全感受不到你正在跑 Windows 虛擬機,用起來就像在 Mac 使用應用程式一樣
- 要看盤的人:由於很多看盤軟體目前尚未支援 Mac 系統,使用 Parallels Desktop 就可以很方便切換作業氣筒!
- 正在尋找雙系統最佳方案的人:Parallels Desktop 真的是我用過最方便的虛擬化軟體,Mac 支援度也比其他虛擬機軟體還要好,推薦給大家使用!
Parallels Desktop 優缺點分析
接下來就帶大家分析看看 Parallels Desktop 的優缺點,這些優缺點都是我自己使用了 Parallels Desktop 三年以上的使用心得,給大家參考:
優點
- 效能很順,不會覺得在使用虛擬機
- 切換方便,完全不需要重開機
- 資料共用或移動容易
- 可將作業系統視窗化或使用融合模式
- 效能足夠的話,可以一次運行多個虛擬機
缺點
- 運行中電腦會很耗電
- 一次運行多個作業系統,電腦容易發燙
- 效能沒有原生系統來的好
- 必須支付費用購買軟體
Parallels Desktop 價格方案與優惠活動
Parallels Desktop 是付費軟體,目前提供免費 14 天試用期,試用結束後就可以依需求購買正式授權。
每年官方都會推出不同的限時優惠活動,像現在全站約有 65 折優惠,而黑五檔期(11/4 起)更是限時 5 折!
如果想掌握最新優惠,也可以隨時回來看這篇文章,我們會持續更新最新活動資訊。

標準版 Standard Edition
一般的家庭、學生、上班族及輕中度使用者,只要使用標準版的 Parallels Desktop 就很足夠了!

Parallels Desktop 標準版可選擇永久買斷或者每年訂閱,永久買斷顧名思義只要付一次錢即可,但未來升級就必須額外付費,一次付清費用為 $129.99 美元。
每年訂閱可隨時升級到新版本,且還授權使用可遠端操控 Mac 的 Parallels Access 軟體,一年的訂閱費為 $99.99 美元。
因此如果你有長期使用需求,我會比較推薦你使用訂閱版。
💻 Mac 也能順跑 Windows!
Parallels Desktop 可讓 macOS 與 Windows 同時運行,不需重新開機,檔案直接拖曳共享,工作更有效率。
🔥 618 限時優惠至 6/26
輸入優惠碼【PARALLELS45】享 55 折優惠
- 支援 Apple M 系列晶片
- 相容 macOS Sequoia
- 資料傳輸速度最高提升 4 倍
- AI 測試、程式開發、Windows 軟體都適用
不想為了 Windows 再買一台電腦?不妨試看看 Parallels 吧。
專業版 Pro Edition
專業版適合像我一樣的工程師、開發人員、測試人員或重度電腦使用者。專業版目前只提供訂閱方案,訂閱費用為一年 $119.99 美元。

專業版可以將虛擬機調整到 8GB RAM 以上,像我自己大多都在 Mac 中運行另一個 Windows 系統,因此基本上我會預留一半的 RAM 分給 Windows 虛擬機(我的 macbook pro 買的是 64GB RAM)。

專業版具有以下優勢:
- 支援 Visual Studio、Docker、Jenkins 等專業軟體
- 可自訂命名網路,適合需要設定多個虛擬網路渠道的使用者
- 可共享特殊硬體、限制虛擬機使用率、RollBack 模式等
若你有需要把虛擬機規格調整到 8GB RAM 以上、4 個 CPU 核心以上,我會比較推薦你可以訂閱專業版來使用。
企業版 Business Edition

企業版與專業版功能差異不大,一樣僅提供訂閱方案,一年為 $149.99 美元,主要多了以下三種功能:
- 大量部署模式:可以一次將 Windows 系統部署到企業所有的 Mac 上
- 授權管理系統:可以讓企業管理員透過 Mac 主機資訊管理 PD 的授權
- 安全性與資料防護:可以限制每個企業使用者對虛擬機的調控權限
如果是十個以上授權的企業用戶,也可以點擊畫面上「索取 10 個以上授權的報價」,會比零售還便宜很多!

學生版 Student Edition
*目前官方已開放 中國與台灣地區 的使用者申請,只要通過教育信箱驗證即可。
學生與教職員工只要持有學校的 .edu 電子郵件信箱,現在都可以申請 Parallels Desktop 學生折扣方案,可享 5 折優惠,一年只要 US$39.99,相當划算!

申請方式也很簡單:
- 前往官方教育優惠頁面:Parallels 學生方案
- 依照頁面指示輸入學校信箱並完成驗證
- 也可參考官方說明文件:教育方案教學
只要通過驗證,不論是在校學生還是教職員,都能享有與國際用戶相同的 5 折優惠,非常推薦趁活動時一併入手!
Parallels Desktop 安裝與免費試用教學
以下教學步驟以 Parallels Desktop 20 為例(目前版本為 PD 26),實際畫面可能會依版本略有不同。
step 1
進入 Parallels Desktop 網站,點擊「免費試用」
step 2
輸入 Email 並點擊「提交」
step 3
點擊「下載 Parallels Desktop」,下載 Parallels Desktop 的安裝檔
step 4
點擊打開下載後的 .dmg 檔案
step 5
開始執行安裝 Parallels Desktop
step 6
點擊「接受」軟體授權合約
step 7
點擊「啟用」客戶體驗計畫
step 8
輸入 Apple 系統密碼開始安裝
step 9
確認 Parallels Desktop 檔案目錄的存取權
step 10
需要許可的目錄包括桌面、文件、下載項目
step 11
依照個人使用狀況,選擇是否要直接安裝 Windows- 想直接安裝 Windows :請點擊「安裝Windows」
- 想後續再安裝: 請點擊「其他選項」,並且跳至本文下個章節閱讀

step 12
若選擇安裝 Windows,系統就會開始自動下載及安裝 Windows
step 13
出現以下畫面就代表安裝完成
step 14
註冊 Parallels 帳號資料,或使用其他平台帳號直接登入
step 15
註冊登入後,就可以開始使用 Parallels Desktop 了*新註冊用戶免費使用14天,右上角顯示「購買」按鈕代表正在試用中

Parallels Desktop 方案購買教學
在 14 天的免費試用期過期之後,大家如果想要繼續用,就要購買正版的 Parallels Desktop 授權了,這一段就教大家該如何一步步購買授權。
step 1
進入 Parallels Desktop 網站,點擊「立即購買」
step 2
選擇方案,確認價格後點擊最下方「立刻購買」
step 3
輸入註冊與付款資訊後,點擊「下一步」繼續購買
step 4
在這個畫面稍微停留久一點,有機會跳出優惠訊息
step 5
確認結帳及付款資訊後,點擊「立即購買」
step 6
等待訂單確認
step 7
購買成功後畫面會顯示產品金鑰與下載按鈕,請妥善保存金鑰
step 8
回到信箱收取訂單通知信件,訂單號碼與金鑰也會寫在信件中
step 9
右鍵點擊 App LOGO 選單,選擇「帳戶與授權」
step 10
查看授權狀態,點擊左下角「輸入金鑰」
step 11
輸入金鑰並確認後,點擊「啟動」
step 12
啟動成功之後會顯示「已經成功啟用」的訊息
step 13
可以點擊左上選單檢查授權,會顯示明確的到期日
Parallels Desktop 使用教學
使用模式操作教學
Parallels Desktop 在虛擬機上有多種的操作模式,包括視窗模式、融合模式、單一/多全螢幕模式、子母畫面模式等等,我們就一個一個來嘗試看看吧!
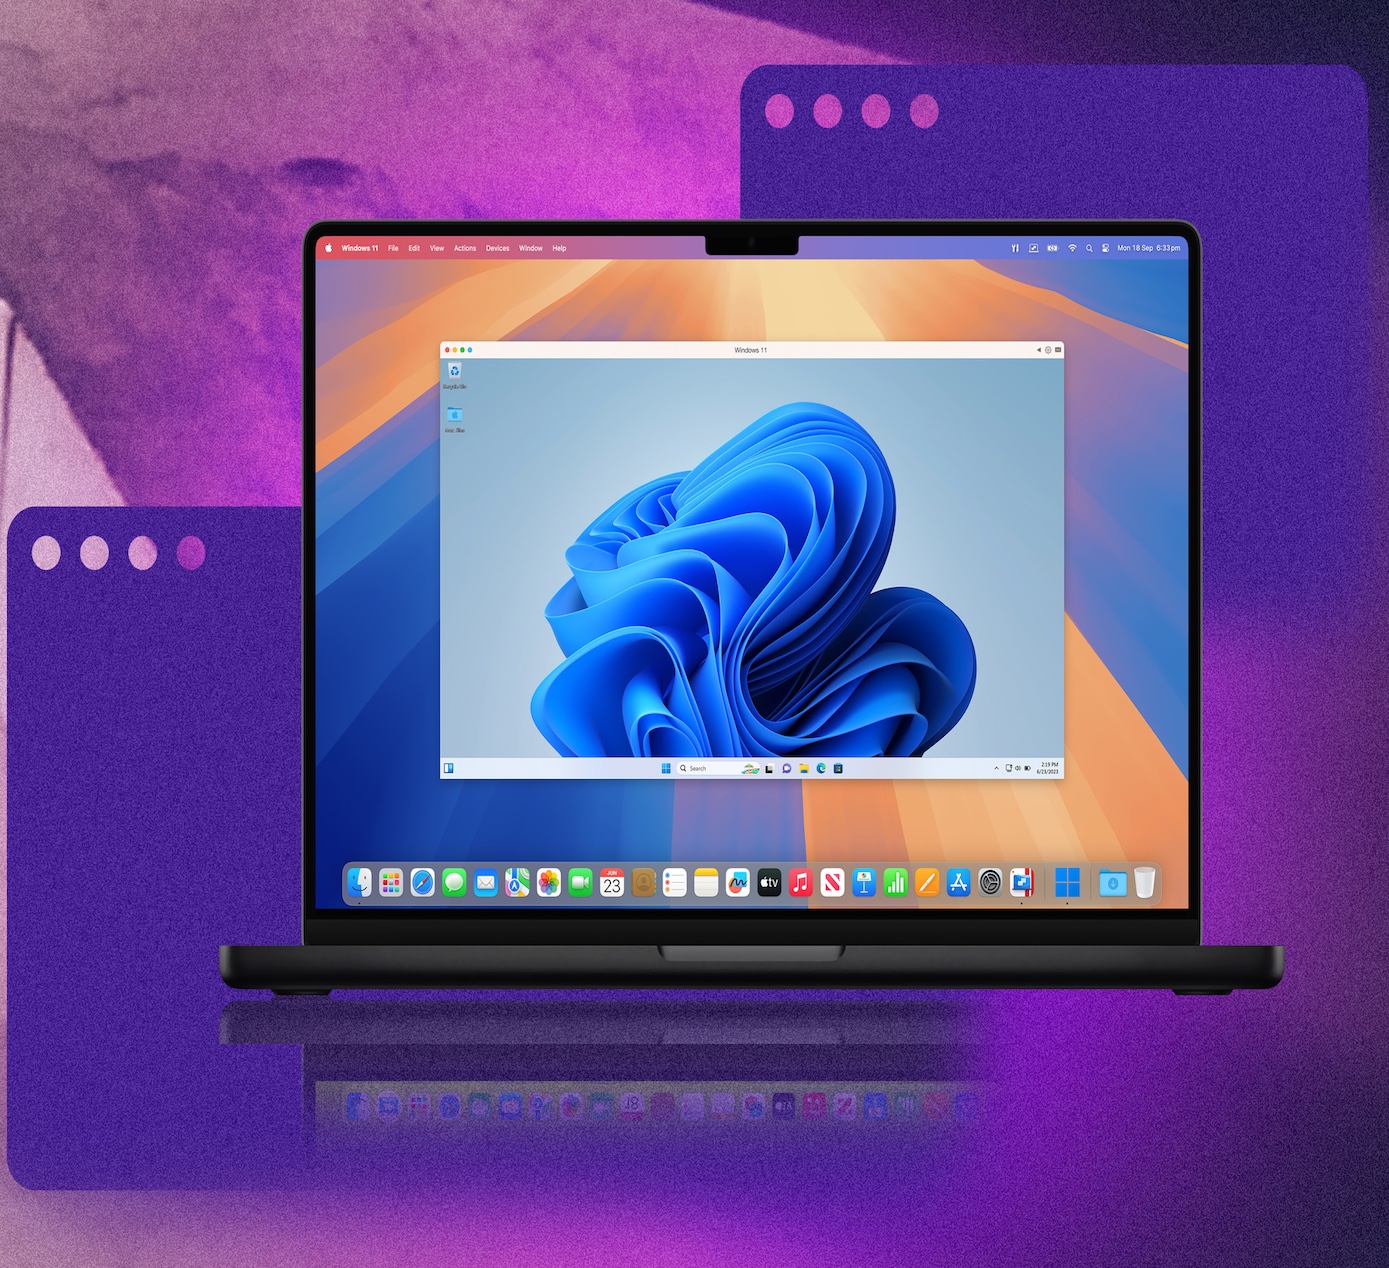
視窗模式
視窗模式就是最一般的模式,可以讓你用視窗化方式去操作 Windows 系統,大小、位置隨你拖曳,非常方便!
step 1
一般預設開啟就會是視窗模式
step 2
視窗模式的右上角會有可設定的按鈕,可自行調整
融合模式
融合模式可以讓整個 Windows 虛擬機融入到 Mac 系統當中,可以直接在 Mac Dock 上打開虛擬機內的應用程式,完全無違和使用!
step 1
開啟虛擬機後,在上方工具列選擇「進入融合」
step 2
開啟融合模式後,點擊 Dock 上的 Windows Logo 會顯示工作列
step 3
也可以直接打開像是 Edge 這種 Windows 虛擬機內的軟體
step 4
從上方菜單可以選擇「退出融合模式」
step 5
退出之後,原本已經開啟的應用程式還是會在虛擬機內開啟
全螢幕模式
step 1
點擊上方菜單,點擊「進入全屏」
step 2
整個畫面都是虛擬機 Windows 系統了
step 3
滑鼠滑到畫面上方,可以叫出工具列
多個螢幕的全螢幕模式
全螢幕模式不只可以一個螢幕,如果你有把 Mac 電腦外接螢幕的習慣,也可以讓每個螢幕都是虛擬機的畫面哦!
step 1
點擊上方菜單,選擇「將全屏模式應用於所有顯示器」
step 2
等待一下就可以看到每個螢幕都是虛擬機的全屏畫面囉!
子母畫面模式
子母畫面模式是檢視用,開啟這個模式可以讓你繼續使用 Mac 系統工作,一邊監控虛擬機的狀況,很適合安裝東西或者跑東西的時候使用!
step 1
以下是官方子母畫面的說明
step 2
選擇上方菜單,點擊「進入子母畫面」
step 3
就可以看到子母畫面囉,左上那個小視窗會一直維持在最上面視窗唷!
虛擬 Windows 效能調整教學
step 1
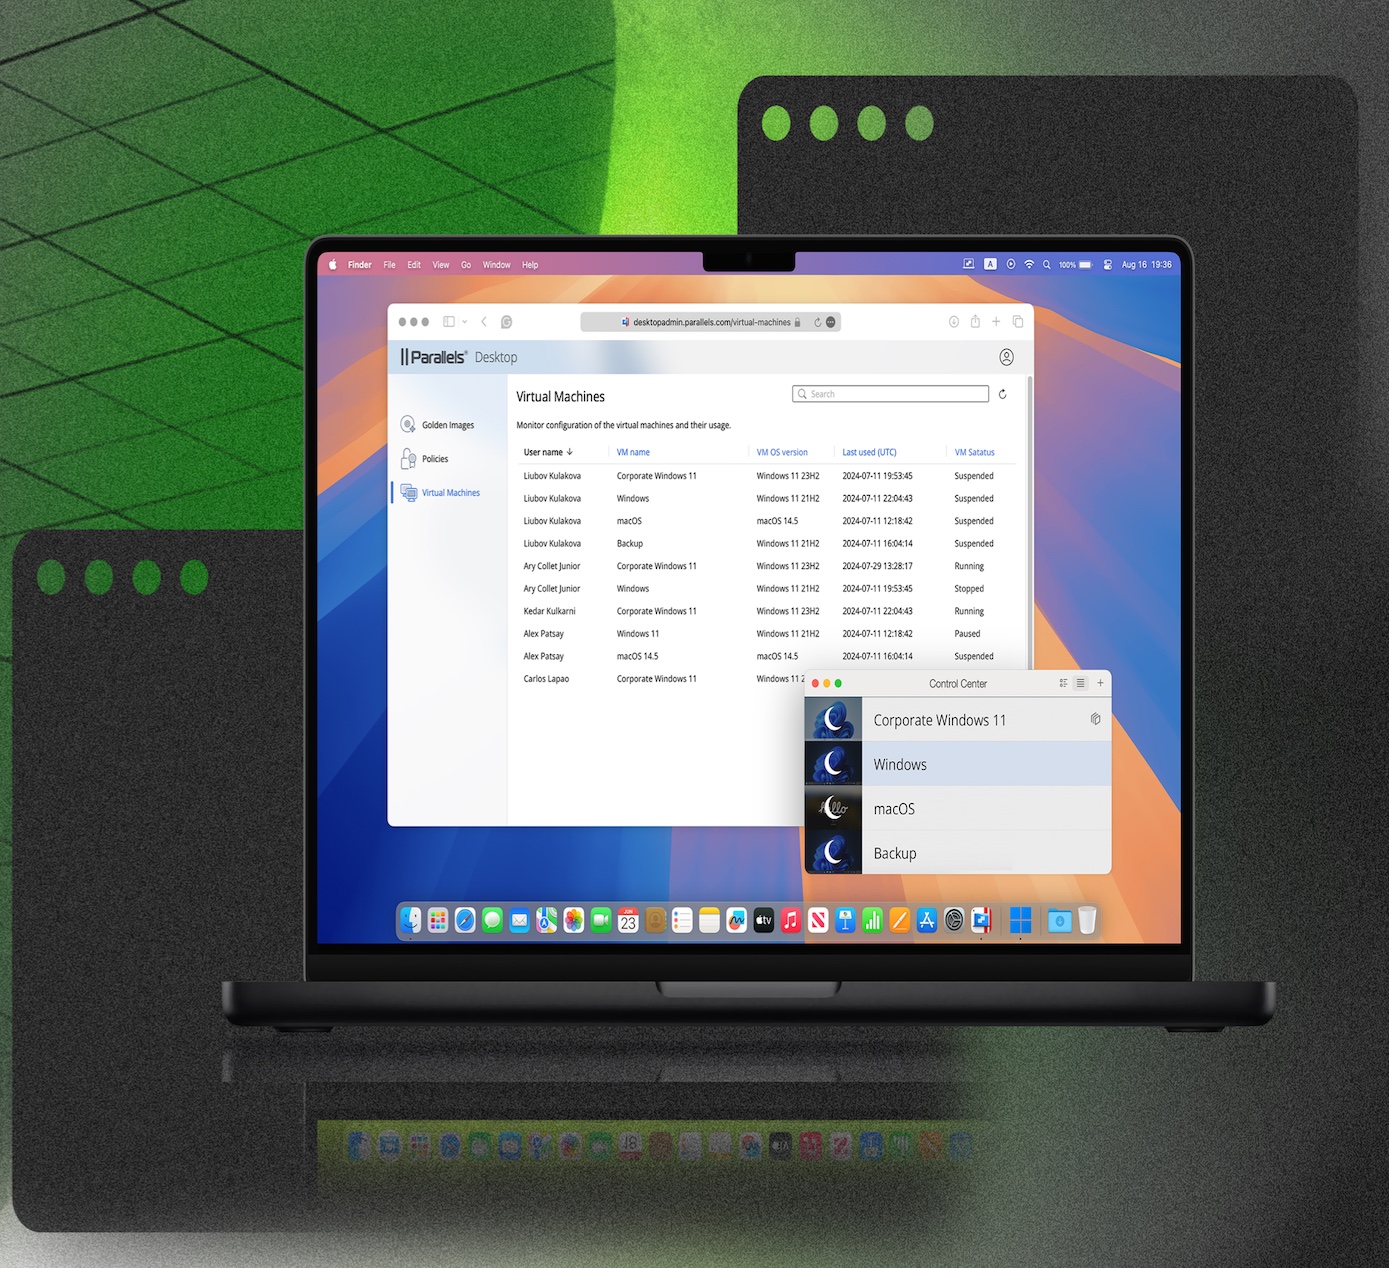
如果有兩台以上的虛擬機,預設開啟軟體就會進入到控制中心,點擊紅框開啟設定畫面
step 2
如果只有一台虛擬機,則會直接開啟虛擬機畫面,右上角也可以開啟設定視窗
step 3
找到「通用> 配置針對」,點擊「更改」
step 4
總共有五種效能配置模式五種模式會應對不同的效能設定,你可以都試試看,然後再跳到下面步驟 CPU、RAM、顯示設定畫面,去看看 Parallels Desktop 幫你自動套用了什麼設定。

手動修改 CPU 核心數與 RAM
進到「硬體 > CPU 與記憶體」設定畫面,可以選擇處理器的核心數量,以及記憶體的容量。
建議大家在選擇記憶體或 CPU 核心數時,還是要留給 Mac 系統一些效能,免得整個電腦會被虛擬機搞到當機!

手動修改顯示器優化
在「硬體 > 圖形」的設定畫面中,解析度有三種不同模式,如果你有外接螢幕的話,可以三種都試試看,看哪一種在你當前螢幕上看起來比較正常一點唷!

macOS 與 Windows 資料共用設定
Parallels Desktop 還有一個很好用的功能,那就是可以在 macOS 系統與 Windows 虛擬機之間共享資料夾!
step 1
開啟「選項 > 共用」畫面,選擇要共用 Mac 哪些資料夾給虛擬 Windows 系統
step 2
也可以點擊「+」,手動選擇要共享哪些目錄給 Windows 系統
step 3
也可以設定 Windows 虛擬機要共用哪些資料夾給 Mac 系統
step 4
開啟虛擬機後,就可以在虛擬機內讀 Mac 的特定檔案目錄
Parallels Desktop 退費教學
若使用起來真的覺得不太符合自己的習慣及需求,也是可以申請退費的,官方目前提供的是 30 天內無條件退費。
step 1
先確認退費所需提供的必要資料
step 2
找到有訂單編號的那封Email,將訂單編號存起來
step 3
點此連結進入退費申請網站,填寫畫面中對應資料- Your full name:輸入你的全名
- Your email address:輸入你購買時的電子信箱地址
- Subject:輸入主旨「I just purchased Parallels Desktop and want to request a refund.」

step 4
依序填寫以下欄位資料- What is your question about?:請在下拉式選單中選擇「Refund request」
- Please enter the first 3 letters of the …:輸入Parallels,會跳出提示選項可選擇
- Order Reference Number:輸入你從信箱複製的訂單編號
- Your question or feedback:再輸入一次「I just purchased Parallels Desktop and want to request a refund.」

step 5
退費申請成功後會在右上角提示,接下來就是靜待退費通知
step 6
退款成功後,就會收到一封 Email 確認
結語
以上就是 Parallels Desktop 的軟體介紹,如果使用或安裝上有遇到任何問題,都歡迎在底下留言給我們,我們會盡快替大家解答的!如果對我們領先時代的數位工具推薦或生產力乾貨有興趣,也歡迎你訂閱我們的電子報哦!
💻 Mac 也能順跑 Windows!
Parallels Desktop 可讓 macOS 與 Windows 同時運行,不需重新開機,檔案直接拖曳共享,工作更有效率。
🔥 618 限時優惠至 6/26
輸入優惠碼【PARALLELS45】享 55 折優惠
- 支援 Apple M 系列晶片
- 相容 macOS Sequoia
- 資料傳輸速度最高提升 4 倍
- AI 測試、程式開發、Windows 軟體都適用
不想為了 Windows 再買一台電腦?不妨試看看 Parallels 吧。


![【TVer VPN 推薦】[year] 怎麼在台灣看日本 TVer?日本 VPN 教學與挑選指南](https://leadingmrk.com/wp-content/uploads/2026/05/tver-vpn-1-1024x576.jpg)


你好
我購買了PD19,但在安裝win11時,會出現“由於您的Mac配備了不支援Intel作業系統的Apple M系列晶片,因此無法使用指定的映像。請在ARM作業系統上使用ISO或VHDX影像檔。“
我的電腦是M2晶片,作業系統是ventura。
請問是不是需要更改什麼設定?
你可以參考這個教學文章設定看看:https://kb.parallels.com/hk/125375
您好,請問您是否有測試過Mac mini M2 + parallels desktop 安裝富邦e01的看盤下單軟體呢? 這個下單軟體是目前使用上唯一需要windows系統的程式,但不確定arm版本的windows可不可以使用,非常感謝您!
剛剛使用 M1 Pro 晶片電腦,下載後可以開啟哦!你也可以使用免費試用的天數去實際測試一下!
我選擇Parallels Desktop 19 for Mac買斷制 但ECJ-J1P-PLM 折扣碼好像不能使用
請檢查確認您輸入的優惠券號碼正確無誤且未過期。每項只能使用一個優惠券號碼。
Hi,剛剛至官網確認,折扣碼的確可以使用在訂閱制上但買斷制不能使用,目前已經發信給廠商確認詢問了!有進一步消息再回覆給您,謝謝您的資訊回報!
C 您好,目前折扣碼已經修正可以使用囉!
請問買 PD 之後還需要煩惱 windows 的序號嗎?還是說沒有 windows 序號也可以正常使用?謝謝
嗨嗨竣豐!
要哦~ Parallels Desktop 是虛擬化軟體,讓你可以在 Mac 上運行 Windows。因此安裝完成後還是需要自己進行 Windows 系統授權。
版主您好,我的設備是MacBook Air m1版本的,已經成功裝了Parallels和Win11,但目前想要把win11系統放在外接的ssd上,請問有可能嗎?以及要怎麼使用呢?
An 你好~我是老K
在你裝好 Parallels Desktop 並且安裝 Win11 之後,你的電腦的 Parallels 儲存槽會有一個 .pvm 的虛擬機檔案。
如果你想把系統放在外接 SSD 上,就把那個檔案移動到外部 SSD,並且之後要開啟 Parallels 之前插上 SSD,並且主動點擊讀取路徑是 SSD 就可以囉!
pvm 檔案如圖:
https://share.cleanshot.com/3RH79u
請問在用parallel desk 的excel 為什麼常常都會出現亂碼啊?
嗨嗨雷克斯~這部分我有幫你詢問 Parallels Desktop 官方,他們說得要看具體的情況來幫你解決~~
可以去密官方的 Twitter 他們會回覆你哦!:https://twitter.com/ParallelsCares
版主你好,請問我能夠在PD中windows的虛擬主機上下載其他軟體嘛?像是下載遊戲或是一些或是上課需要用到的軟體。
可以哦!用 PD 安裝 Windows 虛擬機之後,基本上使用上就跟正常的 Windows 系統沒兩樣~
遊戲的部分要看支援度,可以直接安裝試用看看,看你玩得遊戲是否有支援可以在虛擬機上運行
那如果是學生,請問建議買斷還是一年一年訂閱,因為是上課需要才接觸到這個軟體,也覺得這個軟體(PD)還蠻棒的,但是如果一年一年買花費有點大…,而且也不是很會使用,該怎麼選擇?
你好~以你的狀態建議可以直接買斷哦!目前 PD18 最新版本已經有支援 M1 晶片了,因此直接買斷也不用擔心有大版本的支援問題!
您好,正在安裝中,許可授權的步驟中,desktop,document 都顯示允許授權,但download 一直顯示進行中,我要等到允許授權,才能點擊 完成嗎?
光看敘述不太知道詳細畫面,不過應該是可以先點下一步,他未來有需要檔案目錄授權的時候會再跳出來問一次的~
HI版主您好~
目前有再考慮購買 IMAC M1版本,想請問目前PD版本已經可以完全相容蘋果的M1嗎?我今天中午有去詢問過蘋果店員,他是跟我說之前有幫客人灌過但相容性不佳,怕我買了多花錢。再麻煩您幫我解惑 感謝 🙂
可以哦!完全相容而且效能很好,我五月才打算來寫篇 M1 專門的使用教學,不過網路上現在應該也查得到相關資源~
那我要敲碗等了!!我現在其實還沒購買PD灌到MACBOOK裡,其實網路有些光看文字還不是很懂@@
記得灌 Windows 要特別去下載 ARM 版本的 Windows 安裝檔案~
我上周先下再試用版PD,裡面就內建WIN11了
請問一下那我有需要再另外安裝有ARM版的WIN嗎?
可以正常使用的話就不用囉~~
版主您好
我目前使用macbook air M1
透過parallels 17 win11打LOL的時候技能沒辦法跟著滑鼠移動,整體而言滑鼠在遊戲內的狀況都不正常,我把針對遊戲優化滑鼠的選項取消還是一樣
請問有解嗎?
可以詢問看看官方人員哦!
客服資源:https://www.parallels.com/hk/about/contact/
您好,請問您裝過XQ的看盤軟體嗎?
想買MAC MINI看盤
感謝您~
沒有裝過耶,可能需要上網查一下支援性
您好,
當安裝到 STEP 10,系統沒有自動下載Windows 10 ARM ISO,想請問可以在那裡手動下載呢?
謝謝
您好,請問如果以windows 11 pro insider preview的方式安裝在Parallels Desktop 上,是否也是要買win 11的授權?
謝謝你
不需要哦,我之前使用 Parallels Desktop 的時候,因為 Windows 11 是使用內側版本,是不需要金鑰認證的。
但正常來說 Windows 跟 Parallels Desktop 是分開的授權,PD授權虛擬機,而 Windows 要另外買~
您好請問我購買買斷版,是否仍須維持訂閱狀態?因為訂閱仍會扣取我的費用
要看一下你的訂閱項目是什麼哦~買斷版就不該會有訂閱費用,詳情可以詢問官方客服人員
你好請問我從試用版去購買,我購買Parallels Desktop for Mac Pro Edition 升級 (1 年使用期) ,但是購買後輸入金曜,發現需要有舊版金鑰,舊版金鑰該從何購買呢?還是不用購買可以從試用版取得?升級版事不是要已經有舊版才能買,是否要退費從新購買?
升級版是給原先就有購買舊版的使用者買來升級的唷,因此你可能要找官方退掉升級版的授權,改成買完整版的金耀
您好,想請問….
我原本有用PD16,安裝Win7專業版,若在Apple M1的電腦,購買PD17後,可以在M1下執行Win7嗎?(我之前是把整個win7拷貝,在PD中開啟就能用了)
但不確定Apple M1能否執行Win7系統,因為公司作業上的軟体,有些只能在Win7執行!
謝謝~~
不行唷,M1 目前只能裝 Windows 10 ,因為目前安裝的方式是要使用 Windows 10 ARM 版本才行,而 Win7 官方已經停止支援,因此也不會推出 ARM 版本
您好,謝謝您詳細比較優劣跟說明
還想請問,最近在考慮買M1 MacBook搭配PD17,
想釐清,PD17會佔用4GB的RAM,是指安裝後並且“開啟”Windows才會開始佔用RAM,還是平常單純用Mac os 沒有開啟windows,就已經固定吃掉4GB的 RAM?
開啟時才會佔用RAM唷
版本您好,想請問利用PD在windows環境下操作,中英切換指令有辦法與macos相同嗎,如果可以的話想請問怎麼設定呢?我的windows在PD下只能透過 option+shift 來切換中英,但我希望能夠與macos一樣透過 中/英 做切換,謝謝您。
請問Windows 10要怎麼改到繁體中文?我嘗試下載安裝, 出現了錯誤碼0x800F0950.
在官方網站下載時,直接下載繁體中文版本唷
版主您好:
請問 momo 官網上賣的與版主介紹的版本同款嗎?
加送快充,感覺已低於一般市面價格,怕有詐 ^^
https://bit.ly/3yC0EIT
我還是會建議官網買唷!
版主您好
請問購買一年版的PD能否安裝在兩台Mac上,因為除了imac現在還需要一台air
在購買時頁面上會寫授權數量哦,一份授權只能用在一台上
版主您好!
想請問一下,我最近因工作需要,在window作業系統下載auotcad繪圖軟體,但每次執行完軟體準備要下載檔案時,則會有視窗直接跳出並告知無法存檔,
不知是否需在您上述所提’‘macOS 與 Windows 10 資料共用設定’‘這邊做設定呢?
謝謝
可以主動選擇一下資料存取的位置,看你是要存在與 macOS 共用的磁區,還是你是要存在 Windows 磁區
你好版主 我想請問 我下載完 也購買金鑰了~但是開啟虛擬機一直跳出 shell> 然後無法進入到windows 畫面 怎麼處理呢~
你安裝成 linux 虛擬機了,跟隨文章裡面的步驟要選對「Windows」虛擬機
版主您好,
我安裝了Parallels Desktop 16,但找不到啟動windows的金鑰,是否忽略了什麼步驟?
Windows 的金鑰是要單獨自己去購買授權的唷,這款軟體主要是「虛擬機」軟體,至於虛擬機內裝什麼作業系統、作業系統需要的授權都是需要自己另外買的~
版大你好:
請問一個很笨的問題(因為第一次要買Mac),在裝虛擬器過程中,window10要另外購買嗎?因為教學上沒提到這一塊,你上面說”系統會開始下載 Windows 10 的 ISO 檔,並且稍後會自動開始安裝”!抱歉新手問題!謝謝!
沒錯唷~Windows的授權要自己另外搞定~
版主您好,
想請教若是採用PD方式,Mac本身的處理器還是要選擇Intel嗎?或是目前M1也可以使用PD?
剛剛幫您詢問了一下PD的客服
他們跟我說「目前PD的M1版本還正在測試版中,尚未發布正式版」
因此以目前來講M1筆電應該是無法使用PD的唷!不過未來等待正式版發布,官方應該會再另行通知的!